Observe your Rust application with Quickwit, Jaeger and Grafana
You may have already come across Lucas Palmieri's blog post Are we observable yet? An introduction to Rust telemetry. If you haven't, we recommend giving it a read, as it provides a comprehensive introduction to handling logs in Rust code.
However, logs alone may not be sufficient, particularly in a distributed architecture. This is where distributed tracing comes into play. At Quickwit, we use traces a lot to understand performance bottlenecks and enhance speed. When faced with slow search responses from Quickwit, we often ask ourselves: What caused the slowdown? Was it network-related, disk I/O, or excessive CPU usage?
In this blog post, we will show how to instrument your application and generate traces from a Rust application, exploiting them from a DevOps perspective. Our objectives will be twofold:
- Analyze the traces using the widely recognized Jaeger UI to gain insights into the application's behavior.
- Derive RED (Rate, Errors, and Duration) metrics from these traces and monitor them in Grafana. We recommend the following resources if you want to dig further: The RED Method from Weaveworks and the Google SRE book on Monitoring Distributed Systems.
Now, let's delve into the walkthrough, where we will cover the following key aspects:
- Instrumenting a simple web API built with Actix.
- Pushing your traces and metrics data into Quickwit.
- Detecting, diagnosing, and resolving issues using Jaeger UI.
- Monitoring the RED metrics (Rate, Errors, Duration) on your application in Grafana.
Please, find the source code for this walkthrough here.
Requirements:
Before we dive into the details, please ensure that you have the following software installed and running correctly on your system:
Rust 1.68+Dockerdocker-composeif you're still running and old version of docker.
Building and Instrumenting the Rust Application
We will create a basic Rust application using the Actix web framework. This application is a web API with a single endpoint. It will fetch posts and their comments from the popular JSONPlaceholder public web API and display them as JSON. To better understand our application life cycle and possibly optimize it, we will make sure to instruments the following routines:
- Fetch posts from /posts.
- Fetching the comments of each post /posts/1/comments
Project initialization and core dependencies
Make a new directory called rust-app-tracing. Navigate to it in your terminal, and run the following commands to initialize a new Rust project.
cargo new web-api
Let's also ensure we have the dependencies needed in our web-api/Cargo.toml file.
actix-web: A fast web framework for building web applications in Rust.actix-web-opentelemetry: Theactix-webframework open-telemetry extension.opentelemetry: The core open-telemetry SDK for Rust, including tracing and metrics.opentelemetry-otlp: A crate providing various open-telemetry exporters.reqwest: A crate providing an intuitive API to make HTTP requests.tokio: Provides an async runtime for our application.
The web API application code
First, let's configure the application tracing by creating a file called telemetry.rs in which we will handle all the tracing configurations.
// telemetry.rs

...

const SERVICE_NAME: &'static str = "quickwit-jaeger-demo";

pub fn init_telemetry(exporter_endpoint: &str) {
    // Create a gRPC exporter
    let exporter = opentelemetry_otlp::new_exporter()
        .tonic()
        .with_endpoint(exporter_endpoint);

    // Define a tracer
    let tracer = opentelemetry_otlp::new_pipeline()
        .tracing()
        .with_exporter(exporter)
        .with_trace_config(
            trace::config().with_resource(Resource::new(vec![KeyValue::new(
                opentelemetry_semantic_conventions::resource::SERVICE_NAME,
                SERVICE_NAME.to_string(),
            )])),
        )
        .install_batch(opentelemetry::runtime::Tokio)
        .expect("Error: Failed to initialize the tracer.");

    // Define a subscriber.
    let subscriber = Registry::default();
    // Level filter layer to filter traces based on level (trace, debug, info, warn, error).
    let level_filter_layer = EnvFilter::try_from_default_env().unwrap_or(EnvFilter::new("INFO"));
    // Layer for adding our configured tracer.
    let tracing_layer = tracing_opentelemetry::layer().with_tracer(tracer);
    // Layer for printing spans to stdout
    let formatting_layer = BunyanFormattingLayer::new(
        SERVICE_NAME.to_string(),
        std::io::stdout,
    );

    global::set_text_map_propagator(TraceContextPropagator::new());

    subscriber
        .with(level_filter_layer)
        .with(tracing_layer)
        .with(JsonStorageLayer)
        .with(formatting_layer)
        .init()
}
Next, let’s implement our API endpoint while adding some instrumentations to the handler functions. It is important to note that our focus is not on what this application does but on generating meaningful and exploitable tracing data from the application.
We first have models files allowing us to serialize and deserialize post and comment.
//models.rs
...

#[derive(Debug, Serialize, Deserialize)]
#[serde(rename_all = "camelCase")]
pub struct Post {
    pub user_id: i64,
    pub id: i64,
    pub title: String,
    pub body: String,
    #[serde(default)]
    pub comments: Vec<Comment>,
}

#[derive(Debug, Serialize, Deserialize)]
#[serde(rename_all = "camelCase")]
pub struct Comment {
    pub post_id: i64,
    pub id: i64,
    pub name: String,
    pub email: String,
    pub body: String,
}
Next, let's work on the API endpoint handlers. Take note of the instrument attribute decorating some functions. That's how we enable tracing on handler functions and subsequent functions it uses to perform its task.
// lib.rs

...

const BASE_API_URL: &'static str = "https://jsonplaceholder.typicode.com";

// The get_post handler
#[instrument(level = "info", name = "get_posts", skip_all)]
#[get("")]
async fn get_posts() -> Result<HttpResponse, Error> {
    // Randomly simulate errors in request handling
    let choices = [200, 400, 401, 200, 500, 501, 200, 500];
    let mut rng = rand::thread_rng();
    let choice = choices.choose(&mut rng)
        .unwrap()
        .clone();
    match choice {
        400..=401 => Ok(HttpResponse::new(StatusCode::from_u16(choice).unwrap())),
        500..=501 => Ok(HttpResponse::new(StatusCode::from_u16(choice).unwrap())),
        _ => {
            let posts = fetch_posts(20)
                .await
                .map_err(actix_web::error::ErrorInternalServerError)?;
            Ok(HttpResponse::Ok().json(posts))
        }
    }
}

// Fetching posts with a limit.
#[instrument(level = "info", name = "fetch_posts")]
async fn fetch_posts(limit: usize) -> anyhow::Result<Vec<Post>> {
    let client = Client::new();
    let url = format!("{}/posts", BASE_API_URL);
    let mut posts: Vec<Post> = request_url(&client, &url).await?;
    posts.truncate(limit);
    let post_idx_to_ids: Vec<(usize, i64)> = posts.iter().enumerate().map(|(idx, post)| (idx, post.id)).collect();

    // fetch post comments one after another.
    for (index, post_id) in post_idx_to_ids {
        let comments = fetch_comments(&client, post_id).await?;
        posts[index].comments = comments
    }

    Ok(posts)
}

...
In the above snippet, we are only sending traces. It's also possible to use capable log collectors to collect logs and send them in Quickwit or other backends.
Using Quickwit to ingest tracing data
Now that we have done building our application. Let’s run it alongside Quickwit and ensure the generated traces get indexed by Quickwit.
Unlike what we did in a previous blog post, we will create a docker-compose file to streamline the setup between Quickwit, Jaeger, and Grafana. The following docker-compose file contains all the necessary configurations.
QW_ENABLE_OTLP_ENDPOINT: Allow Quickwit to accept and ingest tracing and log data.SPAN_STORAGE_TYPE,GRPC_STORAGE_SERVER,QW_ENABLE_JAEGER_ENDPOINT: Allow Jaeger to pull traces and logs from Quickwit for analytic purposes.GF_PLUGINS_ALLOW_LOADING_UNSIGNED_PLUGINS: Allows us to load specific plugins in Grafana.
# docker-compose.yaml
version: '3'
services:
  quickwit:
    image: quickwit/quickwit:latest
    command: run
    restart: always
    environment:
      QW_ENABLE_OTLP_ENDPOINT: true
      QW_ENABLE_JAEGER_ENDPOINT: true
    ports:
      - '7280:7280'
      - '7281:7281'
    volumes:
      - ./qwdata:/quickwit/qwdata

  jaeger:
    image: jaegertracing/jaeger-query:latest
    restart: always
    depends_on:
      - quickwit
    environment:
      SPAN_STORAGE_TYPE: 'grpc-plugin'
      GRPC_STORAGE_SERVER: 'quickwit:7281'
    ports:
      - '16686:16686'

  grafana:
    image: grafana/grafana-enterprise:latest
    restart: always
    user: root
    depends_on:
      - quickwit
    environment:
      GF_PLUGINS_ALLOW_LOADING_UNSIGNED_PLUGINS: 'quickwit-quickwit-datasource'
    ports:
      - '3000:3000'
    volumes:
      - ./grafana-storage:/var/lib/grafana
With this docker-compose file in our project directory, let's create the directories needed for the services to run correctly. Create the qwdata directory for storing Quickwit data.
mkdir qwdata
Then, download and place the Quickwit Grafana data source plugin in the expected location.
wget https://github.com/quickwit-oss/quickwit-datasource/releases/download/v0.2.0/quickwit-quickwit-datasource-0.2.0.zip \
&& mkdir -p grafana-storage/plugins \
&& unzip quickwit-quickwit-datasource-0.2.0.zip -d grafana-storage/plugins
Now let's start all the services (Quickwit, Jaeger, Grafana) by running:
docker compose up -d
Considering there was no issue, let's now run our web application and hit http://localhost:9000/post endpoint a few times with cURL, to generate some traces.
cargo run
curl -X GET http://localhost:9000/post
Wait around 10 seconds before the new traces are indexed and available for search.
You can now check that Quickwit has indexed the tracing data by searching the otel-traces-v0_6 index via cURL.
curl -X POST http://localhost:7280/api/v1/otel-traces-v0_6/search -H 'Content-Type: application/json' -d '{ "query": "service_name:quickwit-jaeger-demo" }'
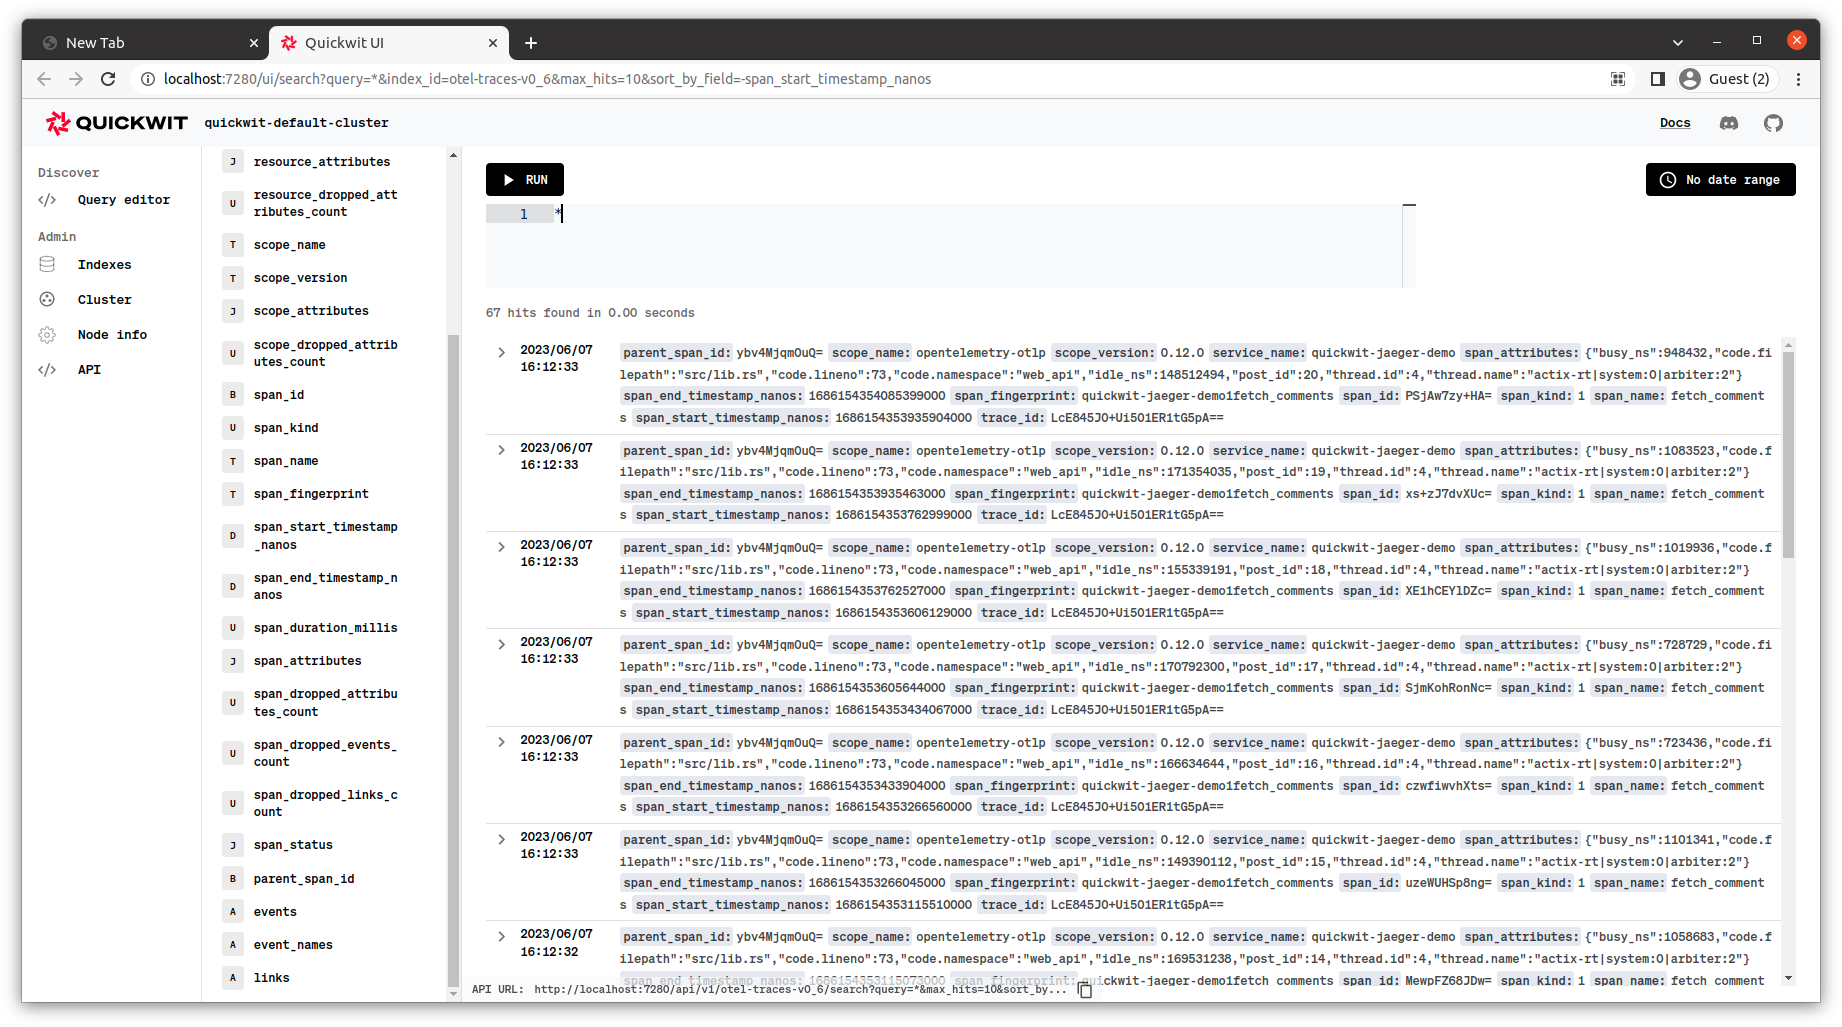
You can also view the data using Quickwit UI http://localhost:7280/ui/search.
Analyzing traces with Jaeger UI.
With the Jaeger container already running, navigate to http://localhost:16686 to visualize our application traces.
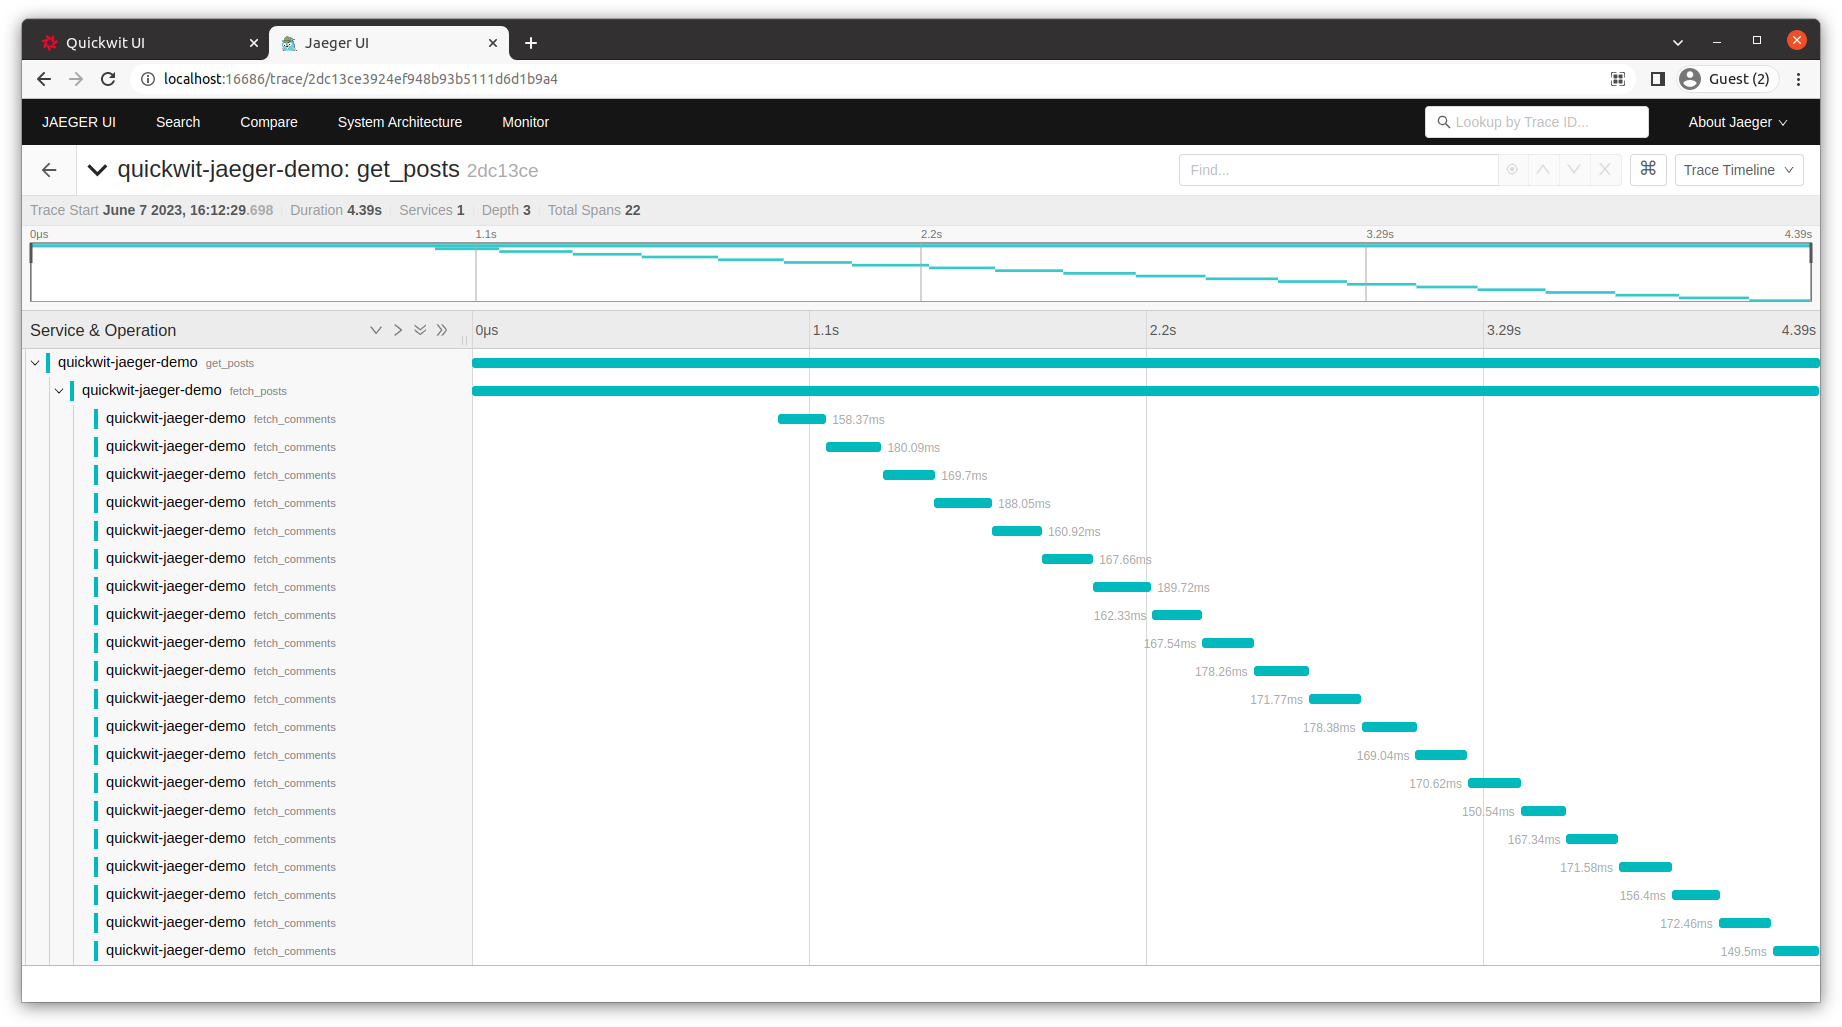
As you can see from the above screenshot, we are sequentially fetching comments for each post. That is, we make twenty requests one after the other. That makes the overall request handling time longer (4.39s above).
But can we do better?
With all the great tools at Rust developer's disposal, the answer is an obvious "Yes!". Let's fetch the comments concurrently by taking advantage of Tokio and the async stream feature of Rust futures crate.
Let's update our fetch_posts function to run the requests concurrently in batches of ten requests at a time. That should speed things up a bit more.
// Fetching posts with a limit.
#[instrument(level = "info", name = "fetch_posts")]
async fn fetch_posts(limit: usize) -> anyhow::Result<Vec<Post>> {
  ...

  // fetch post comments concurrently.
  let tasks: Vec<_> = post_idx_to_ids
      .into_iter()
      .map(|(index, post_id)| {
          let moved_client = client.clone();
          async move {
              let comments_fetch_result = fetch_comments(&moved_client, post_id).await;
              (index, comments_fetch_result)
          }
      })
      .collect();
  let mut stream = futures::stream::iter(tasks)
      .buffer_unordered(10); // batch of 10 request at a time
  while let Some((index, comments_fetch_result)) = stream.next().await {
      let comments = comments_fetch_result?;
      posts[index].comments = comments;
  }

  ...
}
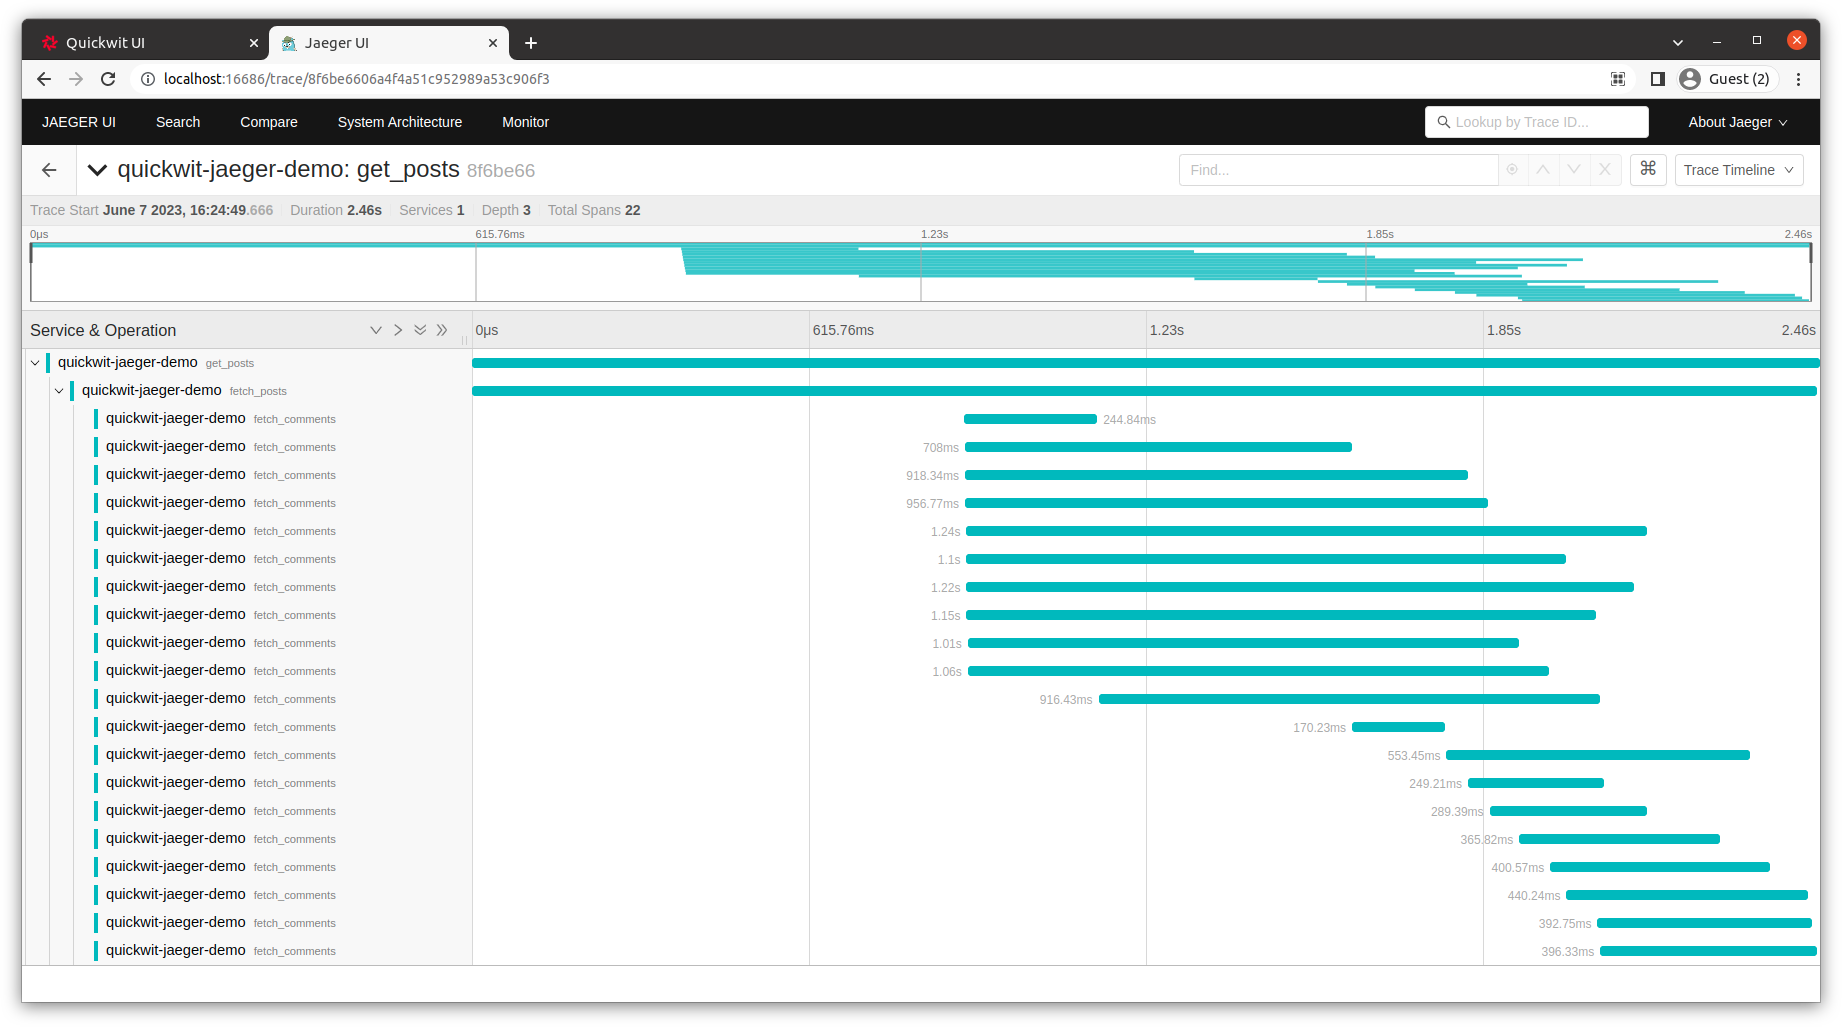
With this change, you will notice we are now handling the requests in about 2.46s, and you can also visually see that we always have at most ten fetch_comments requests running concurrently during the span of our request handler.
Monitoring application metrics with Grafana
Jaeger is good for focused inspection on a single trace. But what if we want to monitor the latencies of our service? What if we want to count the number of errors or request with a given trace metadata?
This is where Grafana dashboards comes in. We want to build the RED metrics from our traces and visualize them in Grafana.
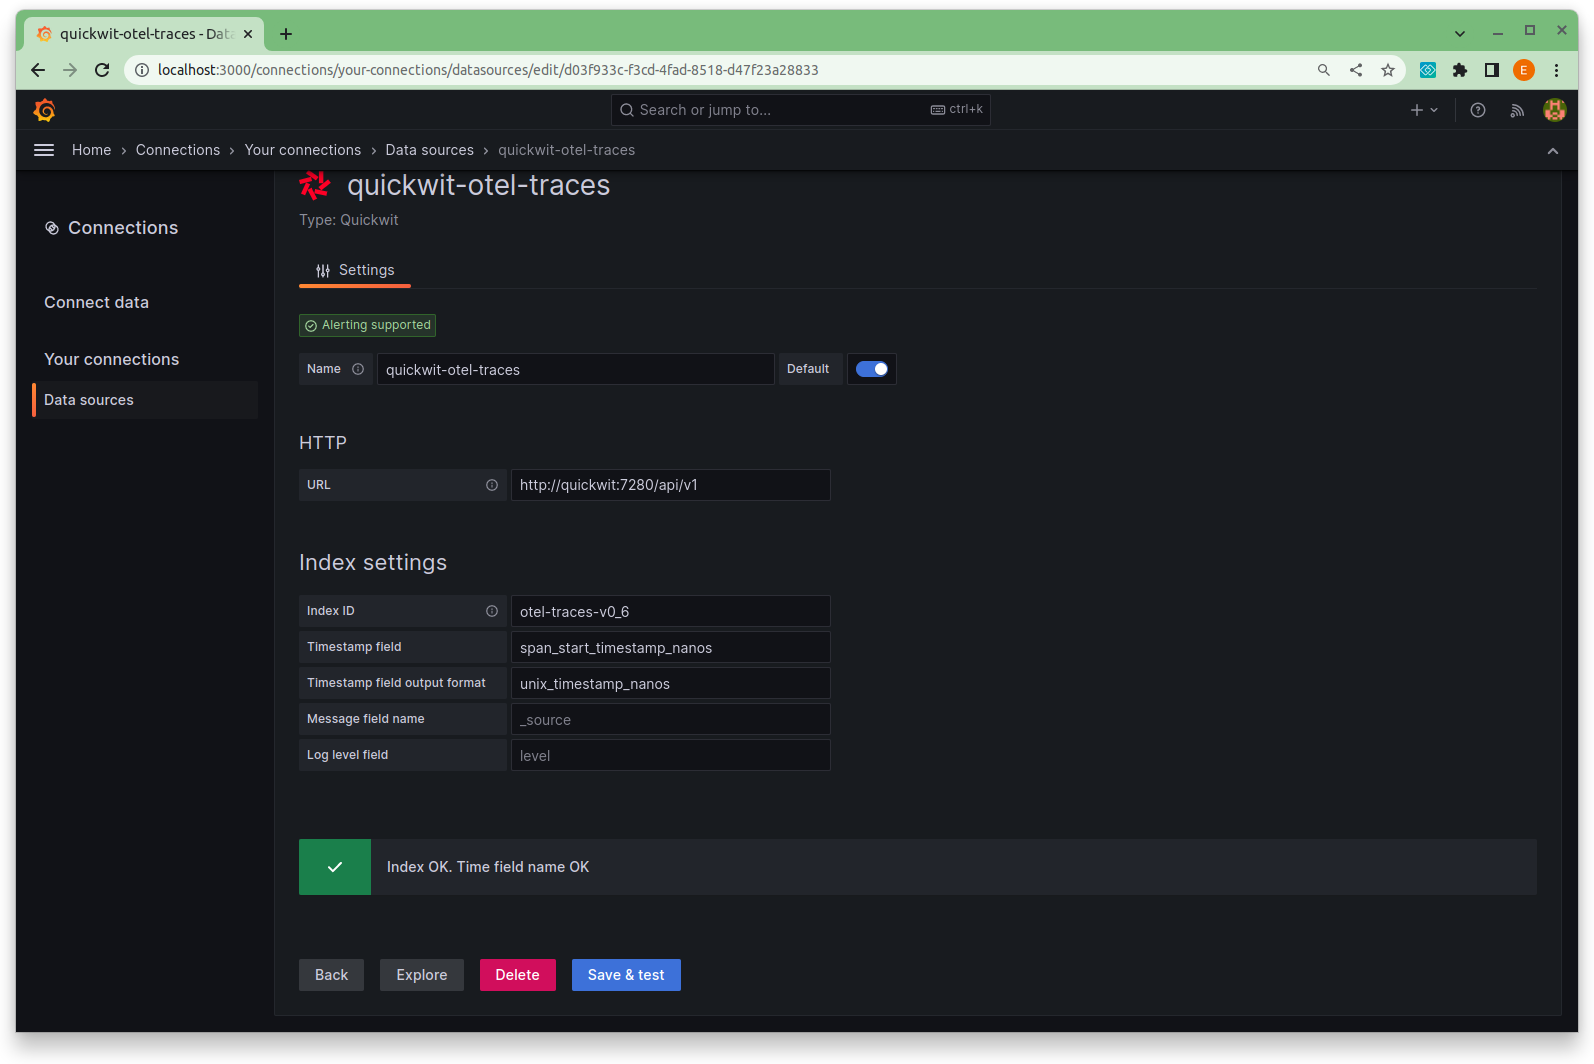
Navigate to http://localhost:3000/login, use admin as username and password to login.
Once logged in, we can connect to Quickwit and query our application traces by using the newly released Quickwit data source plugin.
To make the process of monitoring RED metrics more convenient, we have prepared a pre-configured Grafana dashboard for you to download and import into your Grafana instance.
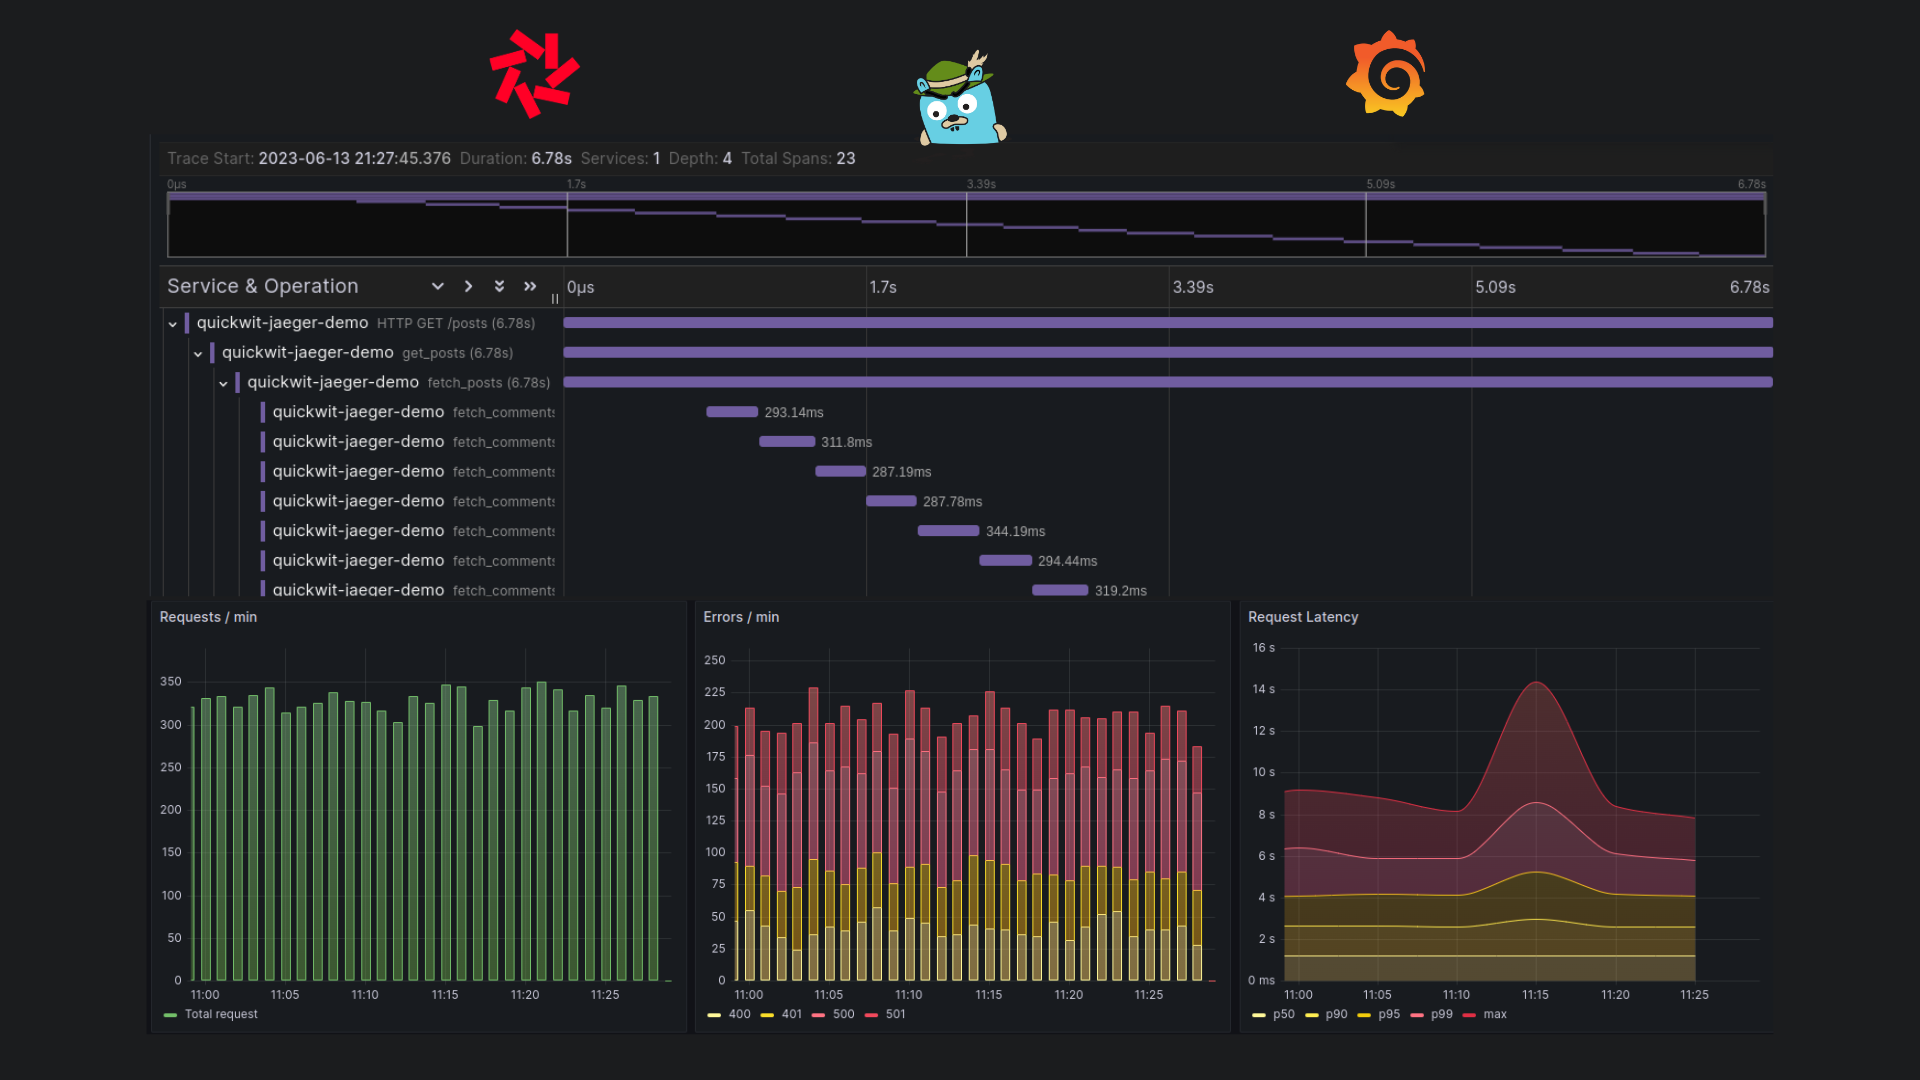
This dashboard serves as a powerful tool for visualizing and understanding the performance. It includes three panels:
- The first panel displays the number of requests per minute.
- The second panel shows the number of errors per minute.
- The third panel presents the duration percentiles of requests per minute.
To observe the metrics in action, you can utilize an HTTP benchmark tool or even use this script provided in the tutorial to send multiple concurrent requests to your Rust application.
Now let's look at a screenshot of the Grafana dashboard, showcasing the metrics after running the script.

Conclusion
That's it! In this blog post, we went beyond basic logging to dive into distributed tracing and how to use it to monitor application performance.
Our experience building Quickwit showed us how distributed tracing was important to understand where we were losing time because of calls to S3 or reading data on a local disk. We hope it will help you too :)
Happy coding and happy observing!
Further reading
We have a bunch of tutorials to use Quickwit for observability. Here are a few links to quick start: